

I think that everyone of you already knows that calling custom .NET DLLs in your extension’s code is not supported in a SaaS environment, but you can still use .NET assemblies in your extensions if you explicitly target the on-premise world.
You can do that by adding “target”: “Internal” in your extension’s manifest file (app.json). This is not what I normally suggest to do on an extension (I always prefer to have the Cloud as the reference model, you can wrap your DLLs in an Azure Function and call your assemblies from there) but I know that there are some scenarios where on-premise assemblies are a need.
I saw that many partners have problems on using .NET assemblies with Docker-based sandboxes and many of them thinks that usage of .NET is not supported on that environment. Nothing more wrong than this!
As explained in the past, you can use DotNet variables in AL with the following pre-requirements/settings:
- Add “target”: “Internal” in app.json file
- Add “al.assemblyProbingPaths” setting in Visual Studio Code by going to File|Preferences|Settings|Extensions|AL Language extension and click on Assembly Probing Paths – Edit in settings.json. Here you need to add the paths where Visual Studuo Code should search for -NET assemblies.
Here what my environment looks like:

I normally have a standard AL project template where all custom .NET assemblies I want to use are placed on the project folder inside a .netpackages subfolder like in the following AL project:

This extension called DotNetTest is a simple extension that calls a custom .NET DLL from an action in the Customer Card page in Dynamics 365 Business Central. The DLL is a very useful C# DLL (class library) defined as follows:
namespace UnusefulDLL
{
   public class UnusefulClass
   {
      public string GiveMeMessage()
      {
         return "This message comes from a .NET DLL";
      }
   }
}
To use this DLL from our extension’s code, in AL we have defined a codeunit with a reference to this assembly and we have defined a procedure that calls the assembly’s GiveMeMessage method:

Then we have a simple pageextension object that extends the Customer Card page by adding a MessageFromDotNet action for calling the .NET DLL method:

OK… all is working and code compiles without problems.
We’re now ready to deploy our extension to our Docker sandbox for testing. Press F5 from Visual Studio Code and…

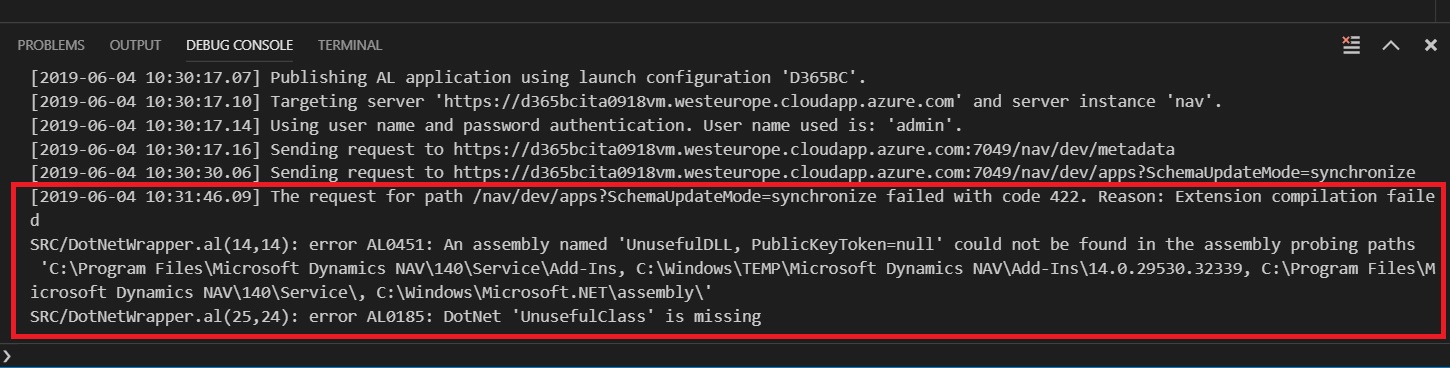
OPS, an error occours!!
The request for path /nav/dev/apps?SchemaUpdateMode=synchronize failed with code 422. Reason: Extension compilation failed
SRC/DotNetWrapper.al(14,14): error AL0451: An assembly named ‘UnusefulDLL, PublicKeyToken=null’ could not be found in the assembly probing paths ‘C:\Program Files\Microsoft Dynamics NAV\140\Service\Add-Ins, C:\Windows\TEMP\Microsoft Dynamics NAV\Add-Ins\14.0.29530.32339, C:\Program Files\Microsoft Dynamics NAV\140\Service\, C:\Windows\Microsoft.NET\assembly\’
SRC/DotNetWrapper.al(25,24): error AL0185: DotNet ‘UnusefulClass’ is missing
Why this?
When you are using .NET assemblies with a Docker-based sandbox, to have your .NET DLLs correctly referenced by the Dynamics 365 Business Central service you need to copy the assemblies from your local path to the container path, otherwise the Dynamics 365 Business Central service (that runs inside the container) will not be able to find and reference the DLL files.
The steps to do are the following:
Step 1: copy the DLL files to the container with the following NavContainerHelper command:
Copy-FileToNavContainer -containerName navserver -localPath C:\D365BCApps\DotNetTest\.netpackages\*.dll -containerPath "C:\Program Files\Microsoft Dynamics NAV\140\Service\Add-Ins"
Step 2: Connect to the container and verify that the assemblies are copied correctly. You can do that by using the following command:
Enter-NavContainer -containerName navserver
and then use the standard DIR command to navigate to the C:\Program Files\Microsoft Dynamics NAV\140\Service\Add-Ins folder inside the container:

Step 3: Restart the Dynamics 365 Business Central service inside the Docker container:
Set-NavServerInstance -ServerInstance NAV -Restart
exit
That’s done!
Now you can deploy your extension without problem from Visual Studio Code:

and if you run it:

It works 🙂

Good morning.
First of all, thank you for this post.
Secondly, is there any way that you can get the differents types of an assembly for a dll that you do not know?
Namely, I donwloaded a dll from the internet, and I know its assembly, but I do not know the types that this dll has. How can I write or know the type in the dotnet file?
Thankx again
LikeLike
You can use Visual Studio or tools like http://www.nirsoft.net/utils/dll_export_viewer.html
LikeLike
Thank you for the article! I’m struggling a little bit with this when it comes to adding the .NETs on the server instance inside the container. If I do Get-ChildItem after entering the container, there are very few directories and none of them look like the classic “C:\Program Files\Microsoft Dynamics 365 Business Central\180\Service\Add-Ins” that you have used, so I can’t go to that directory and see if my .NEts are in there. Any idea what I might be doing wrong?
LikeLike
This perfectly explains the process of working with dlls in business central. Always remember to restart your server instance. I missed it and lost quite a lot of time researching on the resulting errors
LikeLike